Friday, December 23, 2011

asia trip: in the beginning there was lots of traveling

OH DEAR LORD WHY AM I SO BEHIND ON BLOGGING
anyway

so we took lucky star bus out, ...
went to seatlle, had dinner with cathy's family (well, her mom and younger brother) and jason, her friend from high school -- no pics because i hadn't turned asian mode deflect all embarrassment on yet, but expect some from cathy

... so we stayed a night in seattle, which was very foggy and very green and cold but not terribly so

the next day we got up and had delicious scallion pancakes courtesy of cathy's mom and then we set out for the airport to try again

well, there were 100+ seats yet still until ten minutes before the flight should be taking off, they'd let no standby on due to the problems getting an accurate weight estimate (were they turning it into a cargo plane? or just fail on some software package?)... some people had been there 3 or 4 days, which alarmed my friends >__> anyway they cleared all 40 or so standby in the end, including us, and delayed the flight just to get us all on. yay.

13 hours later we arrived in japan. ignore the datestamps, they're all screwed up.

then we used the toilets in Japan. i was amused because i'd been reading about the japanese toilet revolution courtesy of the big necessity, a book i picked up @ mit loading dock sale this term and really like (still working my way through). we also awarded kudos to the sink design.
look how many functions they have!

Thursday, December 22, 2011

vending machine / start of epic asia trip

well speed update
made cardboard proto of vending machine, final project of mas.863

then CAD'd and emergency lasercut one, but still didn't have time to do electronics :/ (buttons are just stuck on there, and i didn't leave space to route servo wires, and i'm using janky self-made continuous rotation servos / zip tie couplers to springs

but first time really CADing the full thing before creating it! compare hexa-not-quite-dancingpod, which was cut by hand and then CAD'd

anyway, open house happened, then I emergency packed and we took T Red line > south station > lucky star bus to NYC (11:30 pm) ... arrive around 4 am and take J nyc metro to JFK airport.

derp! didn't get on flight seattle > narita, (yay standby) due to some weight balancing fail. (flight left with 34 empty seats)

that's okay, we got to meet cathy's family! (cathywu.posterous.com)

well got on next day

ack! have to get on flight narita > taiwan now.

[edit: for more updates on vending machine, see: http://orangenarwhals.blogspot.com/search/label/vendingmachine]

Saturday, December 17, 2011

emergency motor controller fail

just an update to say no, i did not successfully make a motor controller in 48 hours :)
(see previous post for schematic: http://orangenarwhals.blogspot.com/2011/12/eagle-persistent-hotkeys-emergency-h.html)
what was it? a 6.131 final project / motor controller for hexarideablepod (derived off of an instructables):
which works, but uses an arduino and two victor speed controllers -- total overkill. also, terrible UI: it uses a hard to reach switch for fwd/bwd and foot pedals, which little kids have issues reaching even with the awesome!adjustable-car-seat.

block diagrams! ewww.

https://github.com/nouyang/hexapodtroller for the eagle sch/brd. You can see terrible routing here:
power board (4 FETs to make a full H-bridge)

sig board -- attiny44 and four FET drivers (21844s). also, chain voltage regulators from 24v battery to 15v for drivers to 5v for attiny logic.

speed routing and my inexperience led to use of 24 zero ohm resistors and I still used a jumper :)
hai zero ohm resistor friends
If you look closely, you can see some of the trace fails (compare IRL to board layout) which were probably due to too high error allowances when the fab module was creating the roland modela machine code. See: pins 8 and 9 on the top right side of the topmost IC, the attiny44. They're connected on the board but not on the schematic. I used eagle's erc/drc and it didn't point out a warning so I'm going to assume it was mill code generation settings, not limits of mill capability.

I discovered how useful eagle layers are, even in the interface is terribly clunky.

I create zero-ohm resistors a dumb way that actually turns out to be helpful when populating a lot of them. Since they each have an air wire, I can set air wires to a nice contrasting color and see where they all are:

Another note, I milled out the moles CNC-ly too using GIMP to get the traces I needed, but :/ milled them out too small and had difficulty getting the 3.5mm spacing power connectors to go through the board -- had to carefully use a vise.


This is what the final half-populated boards looked like:


MIT Course Majors Male Female Ratio, Fall 2011 (scraping with google docs)

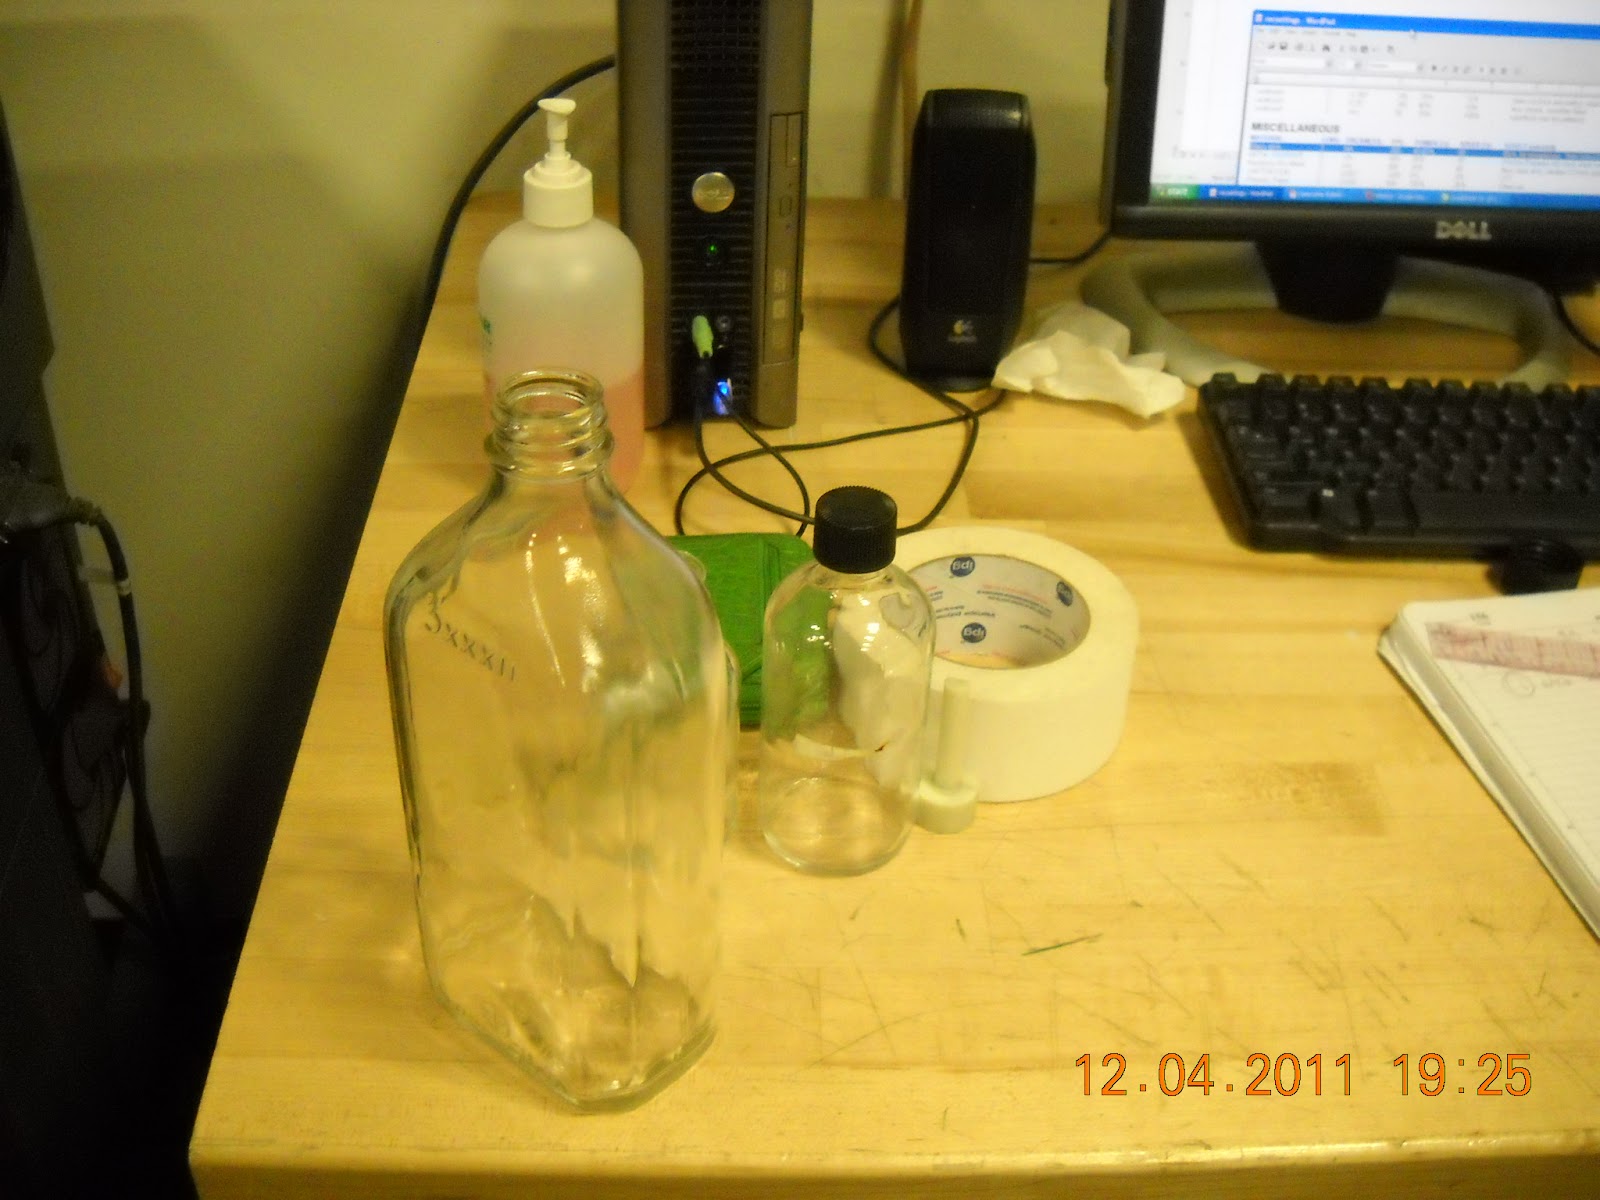
as seen at stata; click to see larger pic
when i saw this in stata a few days ago i legitimately wondered for a few seconds which way this was color-coded until I saw a note (cropped out in this pic), which made me smile. At MIT and hopefully in the general world the imperfect gender ratios are really not so noticeable unless you're looking for it. MIT is wonderful (I say this now because I have no finals this term, all project classes that I loved even if I didn't do as well as I'd've liked)

Anyway, there were no citations! so I decided to go off and investigate on my own and treat it as a data visualization exercise (hi, upcoming IAP / startlabs / c2c / metrify).

EDIT: Derp! I data-failed. You can see civil/environmental engineering (course 1 -- see http://web.mit.edu/catalog/subjects.html if you're confused by the numbers) is definitely off. : / messed up copying and pasting somewhere. Will redo this for realz one day (they have data for multiple years, I want to clean it up automatically).
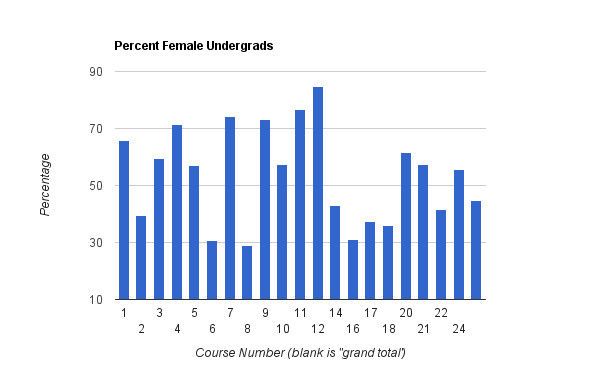

sorted by %
sorted by course number

~~

http://www.quora.com/MIT-1/What-is-the-gender-ratio-for-each-of-the-majors-at-MIT
data source
Here's the data I used (I should just email them for the csv's, but I thought this would be a simple data scraping exercise):
http://web.mit.edu/registrar/stats/gender/index.html
http://web.mit.edu/registrar/stats/yrpts/index.html
What tripped me up is that the women vs. everyone listing of majors is ever so slightly off, and I have to decide how many distinctions I want to make. Do I really care about 2 vs 2A? not really. If I care about 6-1 vs 6-2 vs 6-3, do I just drop 6-7?

assorted google spreadsheets of data from those sources
cleaned data for charts
https://docs.google.com/spreadsheet/ccc?key=0Atr0HZeoMbmgdHFNZU5mbEdYU2VIOE1BUTRLZHJJVkE

raw data sorted for female / undergards
https://docs.google.com/spreadsheet/ccc?key=0Atr0HZeoMbmgdFg0Vk14RW9JQjJtSFFsMXJBZ2hnSEE

raw scraped html table data
https://docs.google.com/spreadsheet/ccc?key=0Atr0HZeoMbmgdFYzNUdEN2NKM2lGbHV6OVN4YkJNTmc

where i tried to (see script editor) automagically clean up the data and failed:
https://docs.google.com/spreadsheet/ccc?key=0Atr0HZeoMbmgdFRkSXp5SW9teEJiT0t5U2FJeTBUVnc&hl=en_US#gid=0

the
google apps code 
I used for that last gdoc
function loadImport() {
  var ss = SpreadsheetApp.getActiveSpreadsheet();
  var sheet = ss.getActiveSheet();
  var data_sskey = "0Atr0HZeoMbmgdFYzNUdEN2NKM2lGbHV6OVN4YkJNTmc";
  var row_init = "13";
  var col_ug = "G";
  var col_grad = "M";
  var col_total = "O";
  var col_courseName = "A";
  var col_courseNumber = "Q";
  
  var cols = [col_ug, col_grad, col_total];
  //create arrayformulas for copying selected data over
  //e.g. =ImportRange("0Atr0HZeoMbmgdFYzNUdEN2NKM2lGbHV6OVN4YkJNTmc","Women!G13:G")
  
  //Add Course Names
  var finalRanges = [  '=ImportRange("' + data_sskey + '","Women!' + col_courseName + "13:" + col_courseName+ '")'];
  
  //Add Enrollment Data in alternating female / all 
  for (var i = 0; i < cols.length; i++){
    femRange = '=ImportRange("' + data_sskey + '","Women!' + cols[i] + "13:" + cols[i]+ '")';
    finalRanges.push(femRange);
    everyoneRange = '=ImportRange("' + data_sskey + '","Everyone!' + cols[i] + "13:" + cols[i]+ '")';
    finalRanges.push(everyoneRange);
  }
  
  //Add Course Numbers
  finalRanges.push('=ImportRange("' + data_sskey + '","Women!' + col_courseNumber + "13:" + col_courseNumber+ '")');

  
// Sets the column header names to match copied data.
//sheet.getRange("A1").setValue(range);
  var columnNames = ['Course Name', 'Fem UG', 'All UG', 'Fem Grad', 'All Grad', 'Fem Total', 'All Total', 'Course Number'];
  var headersRange = sheet.getRange(1,1,1,columnNames.length);
  headersRange.setValues([columnNames]);
    //var dataRange = sheet.getRange(2,1,1,columnNames.length);
  for (var j = 0; j < columnNames.length; j++){
   sheet.getRange(2, j+1).setValue(finalRanges[j]);
  }

}
//method getRange(row, column, optNumRows, optNumColumns)


Google Docs Scripting Tutorials
An excellent step-by-step free tutorial on ImportXML (similar to importHTML that I used), how I heard of xpath (which I didn't end up need to use due to importHTML magic): http://www.distilled.net/blog/distilled/guide-to-google-docs-importxml/
other useful tutorials I referred to
http://blog.ouseful.info/2008/10/14/data-scraping-wikipedia-with-google-spreadsheets/
http://blog.fastfedora.com/2011/08/how-to-use-open-apis.html *shudders* speaking of government apis, I really should be less terrible and fix my github codeforamerica repos which I left half-finished. AUGH. I FAIL. This is why I haven't applied to any jobs yet. Upcoming: post on why you shouldn't hire me (with the caveat that I feel okay listing these because these are past mistakes that I don't intend to make again).
http://blog.ouseful.info/2010/02/15/creating-a-winter-olympics-2010-medal-map-in-google-spreadsheets/
eeee shiny http://pipes.yahoo.com/pipes/
I also attempted to use google fusion tables but did not have a good experience.
http://code.google.com/googleapps/appsscript/articles/writing_spreadsheet_data.html
http://code.google.com/googleapps/appsscript/service_spreadsheet.html
To investigate: http://www.propublica.org/nerds/item/using-google-refine-for-data-cleaning

Tuesday, December 13, 2011

eagle persistent hotkeys / emergency h bridge WIP

to get
persistent keyboard shortcuts / hotkeys in eagle, 
since eagle's UI leaves something to desired for me
you need to add lines to the eagle.scr file in the "scr" folder of your eagle installation
e.g. for my windows desktop that is: "C:\Program Files (x86)\EAGLE-5.11.0\scr\eagle.scr"
here's what mine's set at:

# Configuration Script
#
# This file can be used to configure the editor windows.

# eagle Configuration Script -- persistent hotkeys
# nancy ouyang
# 13 dec 2011
Assign F1 'wire';
Assign F2 'move';
Assign F3 'del';
Assign F4 'group';
Assign F5 'name';
Assign F6 'label';
Assign F7 'value';
Assign F8 'copy';


Assign AF1 'route';
Assign AF2 'ratsnest';
Assign AF3 'rip';


emergency high-power h bridge
is in progress and due in oh 18 hours or so (still need to finish schematicking). because i'm actually rich (i live off of instant noodles because i'm a cheap student and would much rather spend the money on delicious components for projects), or at least i feel rich when immersed in the general uh resourceful atmosphere of MITERS / east campus, i bought delicious power components. (as opposed to relying on 6.131 lab ones).

anyway so I emergency learned myself some theory. as usual with my schoolwork, the path of this project went "i'm really lost, but too proud to ask for help so let me confuse myself on the internet". several days later, i feel distinctly antisocial and hopeless and take lots of naps. a few days before the deadline, i start trying to do something and gradually i go "whoa it's starting to make sense." then i go "whoa maybe there is hope after all! I should try to complete this in time" followed by "AAAHHH this is due in [too little time] emergency project!!1!1!!"

current WIP progress (clearly not finished and there are errors, need more buscap, mislabeled components,  etc) --


i referenced shane colton's hexbridge / other motor controllers and charles guan's tinytroller / other motor controllers.

h bridge links
that i used to read up on everything i was supposed to already know:
http://robotechno.us/high-current-h-bridge-with-mosfet.html

this is a good speedy intro to why+ theory + practicals of making your own h-bridge (n+p mosfet design, as opposed to nmosfet-only w/ driver)
http://roko.ca/robotics/h-bridge-fundamentals/1

more links here
http://www.opencircuits.com/Motor_driver

===misc links===
using chip http://www.robotroom.com/HBridge.html + thermal data http://www.robotroom.com/Thermal-PCB-Motor-Driver-Tests-4.html
steppers http://www.massmind.org/techref/io/stepper/hipwrbp-gm.htm
dc motors overview http://www.electronics-tutorials.ws/io/io_7.html
robot power http://www.robotpower.com/downloads/
stepper drivers http://www.nerdkits.com/forum/thread/694/
more reference yay open source hardware http://www.robotpower.com/products/osmc_info.html
stepper and motor control math!theory http://www.divms.uiowa.edu/~jones/step/circuits.html
lots of different h bridge implementations (schematics) http://circuitelec.blogspot.com/2009/07/h-bridge-motor-driver-circuit.html
look, half bridge can be reversible if you have negative rails (terminology ftw) http://www.me.berkeley.edu/ME102/lab3.html
steppers i have access to http://store.makerbot.com/nema-17-stepper-motor.html
because the awesome built in delay fet driver http://www.irf.com/product-info/datasheets/data/ir2184.pdf
==more specific to me links==
http://search.digikey.com/us/en/products/2318-H-RC/M8842-ND/775381?wt.z_cid=ref_octopart_dkc_buynow
http://web.mit.edu/6.131/www/data.shtml
https://docs.google.com/document/d/1deiPGEL8JOQlO9pS5STD-jABaiG5eQzZwwNh8GDAdqQ/edit?hl=en_US
Half-Bridge Circuit Behavior by Dennis L Feuch
http://search.digikey.com/us/en/products/IRFB3207ZPBF/IRFB3207ZPBF-ND/1300656
http://www.etotheipiplusone.net/pics/fvm_3ph.png
http://etotheipiplusone.net/pics/seg/seg_74.jpg
http://www.etotheipiplusone.net/?p=642
http://web.mit.edu/first/kart/controller_rev1.pdf
http://scolton.blogspot.com/search/label/hexbridge
=====


wish me luck...

Sunday, December 11, 2011

CNC Petri BioArt, introduction (no build yet)

it occurs to me that i should explain what bioart is, for those who've never heard of it

or specifically, what i mean in terms of my project: "bioart" = streaking petri dishes with bacteria the glow (fluoresce or bioluminesce).

people have done it by hand for ages
http://en.wikipedia.org/wiki/BioArt


http://www.biology.pl/bakterie_sw/bac_pict_en.html (this site used for reference for DIY broth too)


and these are the different colors i wanted to use (clearly, it's end of term so i won't have time this semester...)
http://2010.igem.org/Team:Cambridge/Bioluminescence/Colour

and to use a pen-plotter system (xy axis gantries) + appropriate stepper software to streak petri dishes by computer instead of by hand.
http://fab.cba.mit.edu/classes/4.140/people/yoav.shterman/interface.html
look ma, i'm all lasercutter!

=====
one of the original inspirations... hunter cole, her living dna:
http://www.flickr.com/groups/bioart/pool/
http://www.huntercole.org/artgallery/livingbacterialdrawings/index.html
http://www.youtube.com/watch?v=28goA0zA6PA

bright enough to light a room / picture (not sure about exposure they used though)
and of course, there's already CNC bioart (with a 3d printer frameset), on agar with drops of flourescent bacteria
http://biodisplay.tyrell.hu/


and recently one with lots of different colors:
http://news.sciencemag.org/sciencenow/2011/09/a-different-kind-of-secret-code.html

====
some on paper instead of agar
http://amychasegulden.blogspot.com/2011/08/time-to-paint-some-petri-dishes.html
http://web.me.com/amychasegulden/Growing_Impressions/Growing_Impressions.html


=====
it's everywhere... here are some misc. links
http://www.microbiana.org/content/glowing-bacteria-light-ocean


=====
=====
Steppers
Digikey has product guides that I'd never seen before (thanks mas.863 classmates)

~~6.131 motor controller notes
notes to self. ir2125 wants 230 mV min, attiny can source max 40 mA per pin 
http://www.irf.com/product-info/datasheets/data/ir2125.pdf

==
spring making: worked on spring-making some more for vending machine.

AVR Studio Screenshots / overview of features (doesn't go over the chip debugger, which I haven't learned to use it)
https://picasaweb.google.com/113942194695013581888/AVRStudio512Dec2011

Thursday, December 8, 2011

Sal Khan's talk at MIT (education, online and IRL)


http://techtv.mit.edu/videos/15484-rethinking-education---sal-khan-3-mit-degrees-85487485-lessons-delivered
'twas recorded! awesome talk, entertaining in its own right (Khan of KhanAcademy.org came to give a talk at MIT) and he brings up some very interesting ideas about education and how to change it for the better. Highly recommended talk.

Monday, December 5, 2011

Spring making, round one + glass etching on lasercutter


round bottle did better than I expected, I guesstimated size with ruler and tried to get it roughly straight with respect to the bed. no "lathe"-like turning tool, but I etched a fairly small area -- approximately straight then, good enough for laser to focus on.

lasercutter: etching glass -- went very quickly. I suspect the anodized aluminum setting may be overkill and can go much faster (perhaps they're settings for straight up etching metal?).

What was this?
last minute crvftmas (everything you give must be "crufted" aka freely obtained, our hall's version of secret santa) gift: laseretch lab glass bottles (clean autoclaved) I got off of reuse a while back
I meant it when I said 50 lbs of lab glassware. 4 boxes. I only took about half from the reuse post too...
pre-etch
Had issues due to irregular shape of bottle with placement and getting it straight :/ oh well (you can't really tell from the photos)

I ended up doing putzputz, winning MASLAB robot, (this year's hall tshirt design, MASLAB team composed of 4 putzen including dfourie), on the back
Also, thicker bottle could not use due to limit of how deep z wise the bed can move o.o

BTW lasercutter settings for 100kw epilog co2 with gas assist:
200 ppi, 40-60% power, 60 speed.

and more pics on picasaweb as always.
https://picasaweb.google.com/113942194695013581888/LasercutterFun#

Spring making round one -- I am still going to investigate manufacturers. but diy:
http://www.instructables.com/id/Make-your-own-springs-in-seconds/
Someone legitimized it in a comment:
“Many years ago I used to make springs this way on a lathe. We used commercially available untempered spring wire and after we finished we heated up the spring to red hot and dropped it into fish oil to temper it.Some times we would make special custom springs by soft annealing standard off the shelf springs and straightening them to salvage the wire. Then we would rewind them to suit the job at hand and re-temper.”
my Emergency!Labduein60minutes!results:
comparison between real vending machine coil off of ebay and my hand-wound in 2 minutes one
I compensated for non-spring steel (unlike Real Coil) by getting thicker diameter (plain steel) wire.
Material acquisition trip to TAGS (right off of porter square T stop in cambridge, MA, next to shaws and radioshack)
hi, receipt for techfair grant. also if you click for larger pic you can see what I bought
everything I could find at MITERS and that I bought, includes some thin spring steel.
Also, ~2'' OD pvc pipe I wanted to wrap my spring around
First, safety equipment check:

Well, find out pvc pipe does not fit inside chuck (compare to hole) and is just too small to be gripped by OD jaws.

Definitely too big for drill. I'd considered making an adaptor -- smaller pipe that fits in drill with two keys slotted through it, or turned plastic that more closely fits pipe and then has a "handle" that the drill grips -- similar to larger sized drill bits. but then weekend passed and emergency!lab dictated I do simpler thing.
Learned about "flipping" jaws, or in this lathe's case swapping out OD jaws for ID gripping jaws. Thanks shane colton and matthew hon
step one, take jaws out by backing it out all the way with chuck key
they're numbered 1-3 (or 4) and must be engaged by scroll (spiral thing that turns when you turn the chuck key) in that order to have an even grip
Well I can't find the right sized ones,
they're curved. top one's threads are "inner diameter" gripping, but too small for  the chuck currently on the lathe
so I gave up and used the smaller diameter aluminum rod stock seen above.
starting it was difficult. There was a preexisting throughhole in the (hollow) rod that I stuck the end of the rod through
So, then I twisted it upward and pressed it to the rod with the glove. This was awkward to do. I immediately applied the square steel stock but you can see I had issues getting it pressed against the stock and creating a uniform spacing, since I only had one hand (spinning the lathe with the other). Surprisingly easy and fast.
yea, very uneven result, will need to do more trials (there went $5 of weldable steel rod, ⅛’’). went very quickly, even by hand.
you can see starting out I didn't get it to follow the rod closely like in the vid, though I am using thicker diam rod

end result again
probably still need use light sensor detect when item vended, safer b/c of uneven nature of coils (can’t dead reckon with degrees of rotation)
==== todo: order light-up buttons, rfid reader, more servos (or hijack from hexadancingpod :/)

(tangentially, this is a ref for designing springs, linked off of makehttp://home.earthlink.net/~bazillion/intro.html)
look how they do it automagically / industrially: http://home.earthlink.net/~bazillion/Trusprings/index.html and sexy video: http://www.youtube.com/watch?v=Ix4-UUelDc4